Homeowners: $100–$300 DIY Bird Proofing That Keeps Your Warranty
Homeowners: $100–$300 DIY Bird Proofing That Keeps Your Warranty
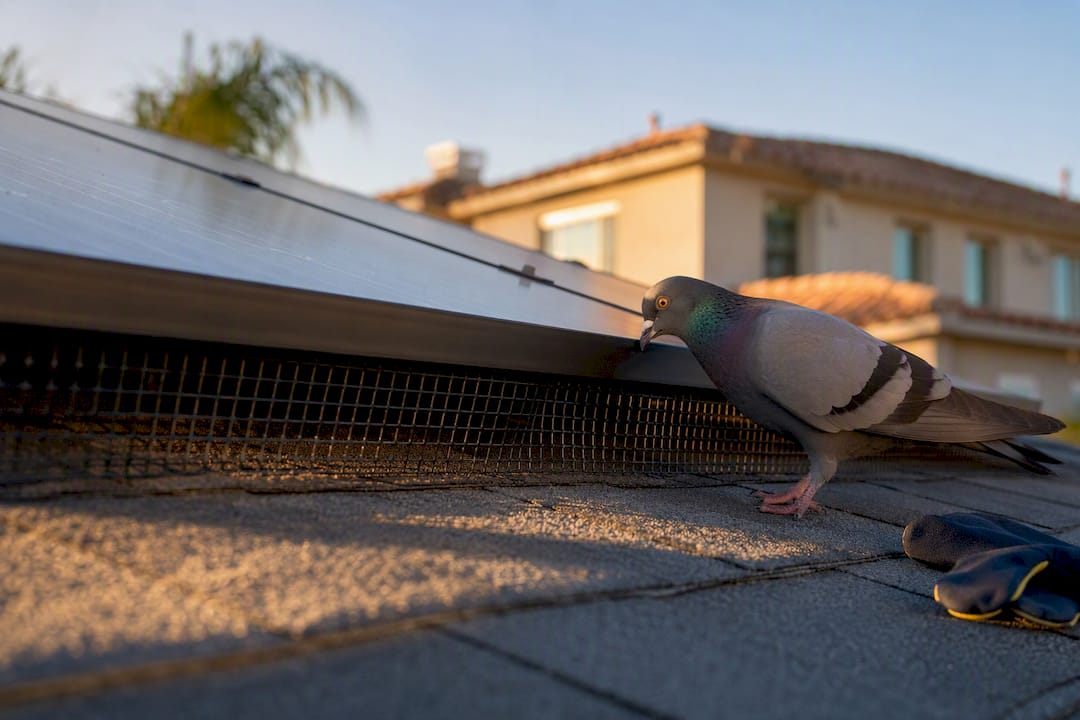
Clip-mounted perimeter mesh is the long-term fix for bird proofing solar arrays, full stop. Spikes, ultrasonic gadgets, and visual scares are supplements at best, and they fail once pigeons already like the spot. Budget roughly a few hundred dollars for a DIY kit or more for a professional install, and call a pro once birds are already nesting, wiring is chewed, or your roof has multiple stories.
TL;DR:
- Proper bird exclusion using clip-mounted mesh is the most effective long-term solution, with DIY kits costing a few hundred dollars and professional installs around a thousand or more.
- Mesh material durability is critical; UV-stabilized HDPE or coated stainless steel mesh lasts significantly longer than untreated nylon or basic galvanized steel, often justified by higher upfront costs.
- Deterrents like spikes and sonic devices offer only short-term relief, as birds quickly habituate and they do not prevent nesting access under panels.
- Gaps at corners, unsealed edges, or mesh degradation from sun exposure are the main causes of failed bird proofing and callbacks.
- Adding bird exclusion mesh during initial system installation is cost-effective, as retrofits later tend to be more expensive and less reliable.
Table of Contents
- Why Bird Proofing Solar Panels Matters More Than You Think
- Which Bird Deterrent Products Actually Work?
- Why Exclusion Beats Deterrence Every Time
- What Materials Should You Specify for a Bird-Proof Mesh Install?
- Should You DIY Bird Proofing or Hire a Professional?
- How Does a Professional Bird Proofing Install Actually Go?
- What We See on Callbacks After Bad Bird Proofing Jobs
- Is Bird Proofing Worth Adding to a New Solar Install?
- Professional Bird Proofing and Panel Care From San Diego Solar
- Sources
- FAQ
Why Bird Proofing Solar Panels Matters More Than You Think
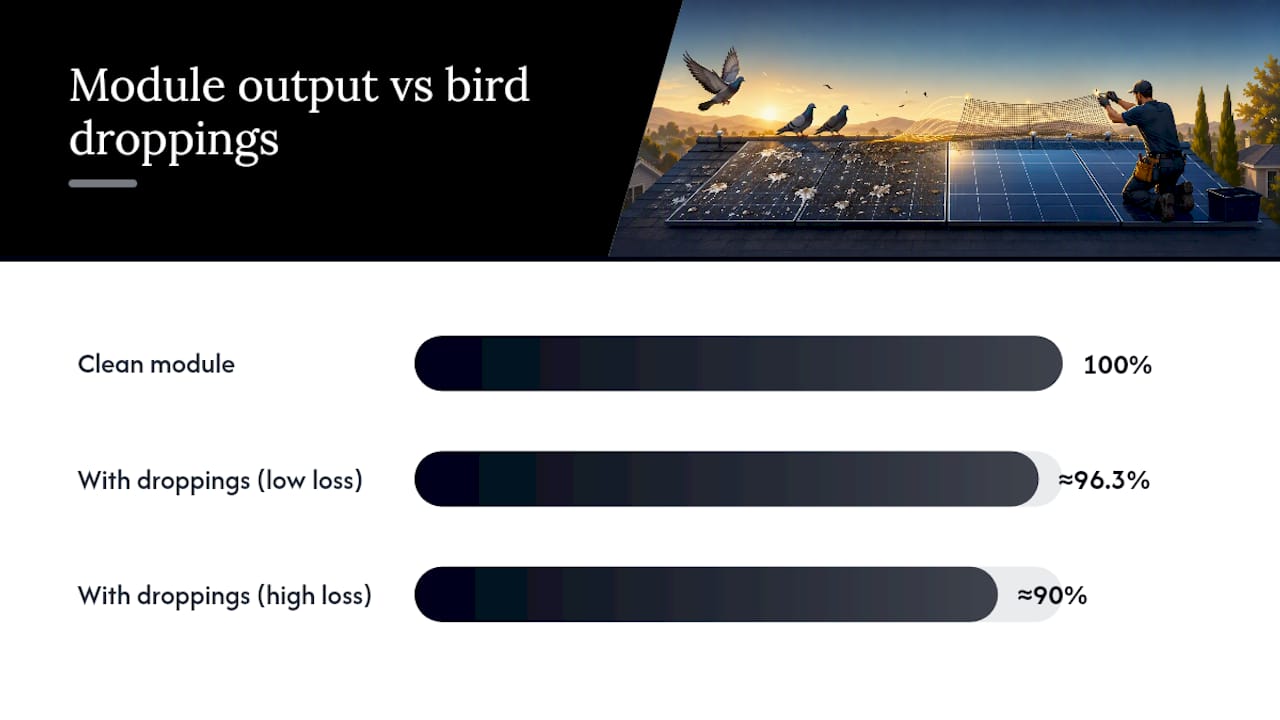
Pigeons and other birds treat the gap under a rooftop array like a custom-built shelter: shaded, dry, safe from predators, and completely ignored until droppings start piling up. That buildup is not cosmetic. Experimental testing using I-V tracers found that natural bird droppings reduced module output by roughly 3.7% to nearly 10 percent on the panels tested before cleaning. Multiply that across a whole array over months of neglect, and you’re losing real production, not just curb appeal.
The industry term for this work is “bird exclusion,” not “bird proofing.” Exclusion means physically blocking access, and it’s the standard installers and solar technicians actually use when they spec a job. “Bird proofing solar” is the phrase homeowners search, but once you’re picking materials, think exclusion.
Which Bird Deterrent Products Actually Work?
Here’s how the main product categories stack up against each other:
- Clip-mounted mesh kits (like the Bird-X Solar Mesh Guard Kit) — the closest thing to a permanent fix. DIY materials run roughly $100 to $300 for a typical residential array; professional installs often land between a few hundred and over a thousand dollars depending on access and roof pitch.
- Rigid plastic skirts — clean-looking and fast to install, but they can restrict airflow under panels, which matters in hot climates where ventilation helps efficiency.
- Anti-perching spikes — solve a different problem entirely. They stop birds from roosting on the top frame rail, but they do nothing to block access underneath, where nests actually form.
- Roof-level netting — better suited to commercial roofs or oddly shaped arrays where perimeter mesh alone can’t cover every gap.
- Ultrasonic and visual deterrents (reflective tape, fake owls, sonic devices) — birds habituate to these within weeks. Installer-focused comparisons consistently flag them as short-term at best, not a real fix for nesting exclusion.
Why Exclusion Beats Deterrence Every Time
Deterrents try to make a space unpleasant. Exclusion just removes the space. That distinction explains why mesh consistently outperforms spikes, tape, and sonic devices in the field: a bird that can’t physically get under the panel doesn’t need to be annoyed into leaving.
Mesh does fail, though, usually for predictable reasons:
- UV-degraded polymer mesh that turns brittle and cracks within a year or two of sun exposure.
- Gaps at corners where installers didn’t fully seal the perimeter.
- Clips drilled straight into panel frames, voiding manufacturer warranties.
Statistic to know: droppings and general soiling measurably cut output, with tested modules losing 3.69% to 9.96% of power before cleaning in controlled studies. That’s the generation you’re protecting when you close off nesting access before it starts, not after.
Netting and spikes still earn a place as complements, mainly on large commercial roofs or where perimeter geometry is too irregular for a single mesh run to cover cleanly.
What Materials Should You Specify for a Bird-Proof Mesh Install?
Not all mesh is created equal, and the difference shows up in year three, not week one. Ask for epoxy-coated 304 stainless steel or UV-stabilized HDPE mesh over bare nylon or basic galvanized steel if you want it to last a decade instead of two seasons. Aperture typically needs to be small enough to block pigeons (roughly one-inch openings or smaller) while still allowing airflow.
- Insist on clip-mounted, no-drill fixings that clamp to the panel frame or racking rather than piercing it.
- Confirm mesh height and clearance match your panel’s mounting gap, usually a few inches.
- Ask suppliers directly for weathering or UV-test data, not just marketing claims.
- Get a written warranty covering both the mesh and the clips separately.
Pro Tip: Untreated nylon mesh commonly fails within one to three years under direct sun exposure. UV-stabilized HDPE or coated stainless holds up far longer, and that difference alone often justifies the higher upfront cost.
Should You DIY Bird Proofing or Hire a Professional?
DIY kits work fine for single-story homes with easy roof access and a straightforward array layout. Installed correctly, they cost a fraction of a professional job. Professional installation makes more sense once your roof involves a second story, steep pitch, tile roofing, or an active bird colony that needs removal first.
- Get multiple quotes and compare line items, not just the bottom-line price.
- Check for nest clearance in the quote. Removing an active nest requires different handling than installing mesh around an empty gap.
- Ask about clip type and material grade specifically. A vague quote (“mesh installation”) is a red flag.
- Confirm warranty terms in writing, covering both material and labor.
- Watch for drilling into panel frames or racking. Any installer proposing this is putting your equipment warranty at risk.
Patchy perimeter coverage, missing corner seals, and no documented material specs are the three most common signs of a rushed job.
How Does a Professional Bird Proofing Install Actually Go?
A proper install follows a sequence, whether you’re doing it yourself or hiring it out.
- Inspect first. Look for active nests (some bird species carry legal nesting protections, so timing matters), check droppings buildup, and review inverter or string-level output for signs of shading loss.
- Clear inactive nests before mesh goes on. Never seal birds in.
- Mount mesh around the full perimeter, not just the front edge. Gaps at back corners are the number one reason birds get back in.
- Tension the mesh so it doesn’t sag, then route cables carefully so nothing rubs against the mesh edge over time.
- Inspect annually. Check clip torque, look for mesh sag, and confirm no new access points have opened at the corners.
Pro Tip: If you notice sagging mesh, chewed wiring insulation, or birds working at the same corner repeatedly, that’s your signal to call a professional rather than patch it yourself. Persistent access points usually mean the original install missed a seal.
What We See on Callbacks After Bad Bird Proofing Jobs
Most callback jobs we get called for share the same three root causes: gaps left at corners during a rushed install, clips or screws driven straight into panel frames, and mesh that degraded under UV exposure within a year or two of installation. All three are avoidable with the right materials and a full-perimeter approach from day one.
We’ve pulled panels off arrays where a previous installer used zip ties and cheap plastic clips instead of proper mesh fasteners. The mesh held for maybe a season before it sagged, and the birds were back within weeks. A clean, full-perimeter mesh job with the right clips should outlast that by years, not months.
When you hire out this work, ask for a photo report of the finished install, a written warranty covering materials and labor separately, and clear documentation of the mesh grade and clip type used. Those three deliverables separate a job that lasts from one you’ll be paying to redo.
Is Bird Proofing Worth Adding to a New Solar Install?
Bird exclusion mesh is cheap insurance against a problem that only gets more expensive to fix later. If you’re installing a new system, add mesh at the same time. It’s a smaller add-on cost bundled into one job versus a separate retrofit later, and it protects both your generation numbers and your roof from years of accumulated droppings and nesting debris.
— Curtis Williamson
Professional Bird Proofing and Panel Care From San Diego Solar
The team handling your bird exclusion mesh can also diagnose wiring faults, replace cracked panels, or clean accumulated droppings, potentially reducing the need to hire multiple contractors.
A proper quote should include line items for inspection, nest clearance if needed, mesh material and clip specs, and a written timeline, usually completed in a single day for most residential roofs. If your panels are already underperforming from soiling or nesting debris, a diagnostic visit starts at $150 to $250 and tells you exactly what’s going on before any work begins. For homes where birds have already caused wiring damage, repair pricing runs $200 to $500 for simple fixes. Start with a free solar consultation and get a straight answer on what your roof actually needs.
FAQ
Is Bird Proofing Necessary for Solar Panels?
Yes, if you want to protect both generation and equipment. Droppings and nesting debris measurably reduce output, with tested modules losing [3.7% to nearly 10 percent] of power(https://doi.org/10.1109/qpain66474.2025.11172055) before cleaning, and nests can chew through wiring over time.
What Is the Best Bird Deterrent for Solar Panels?
Clip-mounted perimeter mesh is the most reliable long-term option, since it physically blocks access rather than trying to scare birds off. Spikes and ultrasonic devices work only as supplements and tend to fail once birds are established.
How Much Does It Cost to Bird Proof Solar Panels?
DIY mesh kits typically run several hundred dollars in materials for a standard residential array. Professional installation costs more depending on roof access and whether active nest removal is involved; San Diego Solar’s diagnostic visits start at $150 to $250 to assess the job first.
What Are the Best Anti-Bird Spikes for Solar Panels?
Anti-perching spikes work on the top frame rail to stop birds from roosting there, but they don’t block access underneath the panels where nests actually form. They’re best used alongside perimeter mesh, not as a standalone fix.
Can I Install Bird Mesh Myself?
Yes, on single-story homes with safe, easy roof access and a simple array layout. Once you’re dealing with a second story, steep pitch, or an active bird colony, hiring a professional reduces the risk of an incomplete seal that leads to callbacks.